panini bread
Table of Contents
Introduction
The magic of a perfect panini starts with the right bread. That satisfying crunch as you bite through the crispy exterior, giving way to warm, melty fillings held together by bread that’s both sturdy and delicious—it’s what elevates a simple sandwich to culinary perfection.
But not all bread is created equal when it comes to making panini bread sandwiches. While regular sandwich bread might work in a pinch, true panini perfection requires specific characteristics that many standard loaves simply don’t offer.
In this comprehensive guide, we’ll explore everything you need to know about panini bread—from making it from scratch using multiple methods to choosing the best store-bought options and mastering techniques for panini success. Whether you’re a seasoned baker or a panini press novice, you’ll find actionable tips and insights to create sandwich masterpieces that rival any you’d find at panini bread near me searches.
What Makes Great Panini Bread?
Key Characteristics
The perfect panini bread possesses several distinct qualities that set it apart from ordinary sandwich bread:
- Sturdy Crust: A good exterior that crisps beautifully when pressed and toasted
- Substantial Crumb: Dense enough to hold fillings without being heavy or tough
- Structural Integrity: Ability to withstand pressing without disintegrating
- Flavor Foundation: Mild enough to complement fillings but flavorful enough to enhance them
- Ideal Shape: Often flat or easily sliceable into even pieces for consistent cooking
Common Types Used
Several bread varieties traditionally excel as panini bread:
- Ciabatta: The classic Italian choice with its rectangular shape and airy-yet-sturdy texture
- Focaccia: Flavorful and pre-seasoned, offering a unique taste dimension
- Rustic Italian Loaves: Crusty exterior with a tender interior that toasts beautifully
- Sourdough: Provides tangy flavor and excellent structure
Homemade vs. Store-Bought: Quick Comparison
| Aspect | Homemade | Store-Bought |
|---|---|---|
| Flavor | Superior, customizable | Variable, often with preservatives |
| Cost | Inexpensive ingredients | Higher price point |
| Time Investment | Requires several hours | Immediate availability |
| Freshness | Unmatched when fresh | Depends on bakery/store |
| Customization | Complete control over ingredients | Limited options |
Module 1: Homemade Panini Bread Recipes
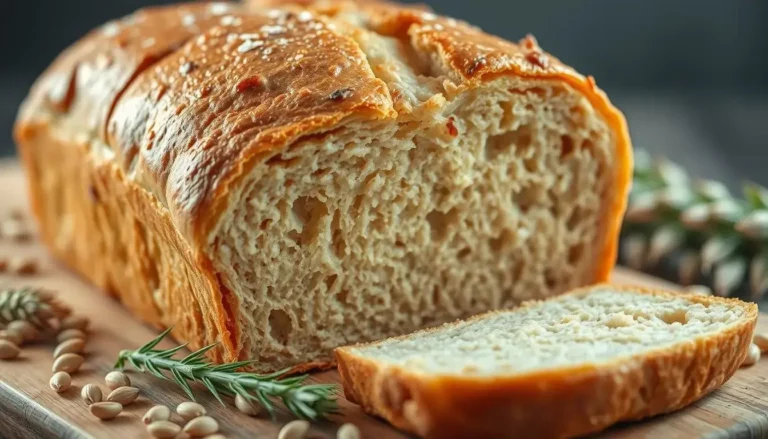
Recipe A: Classic Kneaded Panini Bread
This traditional method produces panini bread with perfect texture and an artisanal quality that elevates any sandwich.
Ingredients:
- 500g (4 cups) bread flour
- 10g (2 tsp) salt
- 7g (2¼ tsp) instant yeast
- 350ml (1½ cups) warm water
- 2 tbsp olive oil, plus extra for coating
- 1 tbsp honey or sugar
- Semolina or cornmeal for dusting (optional)
Instructions:
- Combine Dry Ingredients: In a large bowl, whisk together flour and salt. Make a well in the center.
- Activate Yeast: In a separate bowl, combine warm water (about 110°F/43°C), honey, and yeast. Let sit for 5 minutes until foamy. Why this matters: This step ensures your yeast is alive and active before proceeding.
- Form Dough: Pour the yeast mixture and olive oil into the flour well. Mix with a wooden spoon until a shaggy dough forms.
- Knead: Turn the dough onto a lightly floured surface and knead for 8-10 minutes until smooth and elastic. Why this matters: Proper kneading develops the gluten structure that gives your bread the perfect texture for paninis—sturdy enough to hold fillings but not too dense.
- First Rise: Place dough in an oiled bowl, cover with plastic wrap or a damp cloth, and let rise in a warm place for 1-1.5 hours until doubled in size.
- Shape: Gently deflate the dough and divide into two equal portions. Shape each into a rectangular loaf about 10″ x 5″ (25cm x 13cm). Why this matters: This flat shape is ideal for panini bread sandwiches.
- Second Rise: Place shaped loaves on a baking sheet dusted with semolina or cornmeal. Cover loosely and let rise for 45 minutes.
- Prepare Oven: Preheat to 425°F (220°C). Place an empty baking pan on the bottom rack.
- Score & Bake: Using a sharp knife or lame, score the tops with three diagonal slashes. Place bread in the oven and pour 1 cup of hot water into the empty pan to create steam. Bake for 25-30 minutes until golden brown and hollow-sounding when tapped on the bottom.
- Cool: Transfer to a wire rack and cool completely before slicing.
Prep time: 30 minutes
Rise time: 2-2.5 hours
Bake time: 25-30 minutes
Yield: 2 loaves (approximately 16 panini servings)
Expert Tips:
- Use bread flour for higher protein content, which creates stronger gluten development and better structure
- The dough should feel tacky but not sticky—add flour a tablespoon at a time if too wet
- For extra flavor, add 1 tablespoon of herbs like rosemary or thyme to the dough
Recipe B: Easy No-Knead Panini Bread
Perfect for busy schedules, this no-knead method requires minimal hands-on time while still producing excellent results.
Ingredients:
- 450g (3¾ cups) bread flour
- 8g (1½ tsp) salt
- 3g (1 tsp) instant yeast
- 320ml (1⅓ cups) cool water
- 1 tbsp olive oil
- 1 tsp sugar
Instructions:
- Mix Ingredients: In a large bowl, whisk together flour, salt, and yeast. Add water, olive oil, and sugar. Stir with a wooden spoon until a sticky, shaggy dough forms. Note: This dough will be slightly drier than typical no-knead recipes to ensure the final bread has proper structure for paninis.
- First Rise: Cover the bowl with plastic wrap and let sit at room temperature for 12-18 hours. Why this matters: This long, slow fermentation develops flavor and gluten without kneading.
- Shape: Flour your work surface generously. Gently scrape the dough out—it will be sticky. Using floured hands, fold the dough onto itself 4-5 times, then shape into a flat rectangle about 12″ x 8″ (30cm x 20cm).
- Second Rise: Line a baking sheet with parchment paper and dust with flour. Transfer the dough to the sheet, cover loosely with a kitchen towel, and let rise for 1-2 hours until puffy.
- Prepare for Baking: Preheat oven to 450°F (230°C) with a baking stone if you have one.
- Bake: Brush the dough lightly with water and dust with a little flour. Bake for 25-30 minutes until deeply golden.
- Cool: Allow to cool completely on a wire rack before slicing.
Prep time: 20 minutes
Rise time: 13-20 hours
Bake time: 25-30 minutes
Yield: 1 large loaf (approximately 8-10 panini servings)
Expert Tips:
- Plan ahead—the long rise is hands-off but requires advance preparation
- For best results, use filtered water as chlorine can inhibit yeast activity
- The finished texture should be more compact than traditional no-knead bread
Recipe C: Bread Machine Panini Bread
Leverage technology for consistent results with minimal effort.
Ingredients:
- 375g (3 cups) bread flour
- 240ml (1 cup) water
- 3 tbsp olive oil
- 1 tsp salt
- 1 tbsp sugar
- 2¼ tsp bread machine yeast
Instructions:
- Add Ingredients: Place all ingredients in your bread machine pan in the order recommended by your machine’s manufacturer (typically liquids first, then dry ingredients, with yeast last).
- Select Cycle: Choose the “dough” cycle. Why this matters: We’ll let the machine do the kneading and first rise, then shape by hand for the ideal panini form.
- First Rise: Let the machine complete its dough cycle (typically 1.5 hours).
- Shape: Remove dough from the machine. On a lightly floured surface, divide into two pieces and shape each into a flat oval or rectangle about 9″ x 5″ (23cm x 13cm).
- Second Rise: Place shaped loaves on a parchment-lined baking sheet, cover with a towel, and let rise for 30-45 minutes until puffy.
- Prepare Oven: Preheat to 400°F (200°C).
- Bake: Lightly mist the loaves with water (or brush with olive oil for a richer crust). Bake for 20-25 minutes until golden brown.
- Cool: Allow to cool completely before slicing.
Prep time: 10 minutes
Machine cycle: 90 minutes
Second rise: 30-45 minutes
Bake time: 20-25 minutes
Yield: 2 medium loaves (approximately 12-14 panini servings)
Expert Tips:
- Check dough consistency during the first few minutes of the machine cycle—add a tablespoon of flour if too wet or a teaspoon of water if too dry
- For a softer crust (that will still crisp nicely when pressed), brush with butter instead of water before baking
- If using the bread machine’s bake cycle, be aware the shape will be less ideal for paninis
Module 2: Choosing the Best Bread for Paninis
Deep Dive into Bread Types
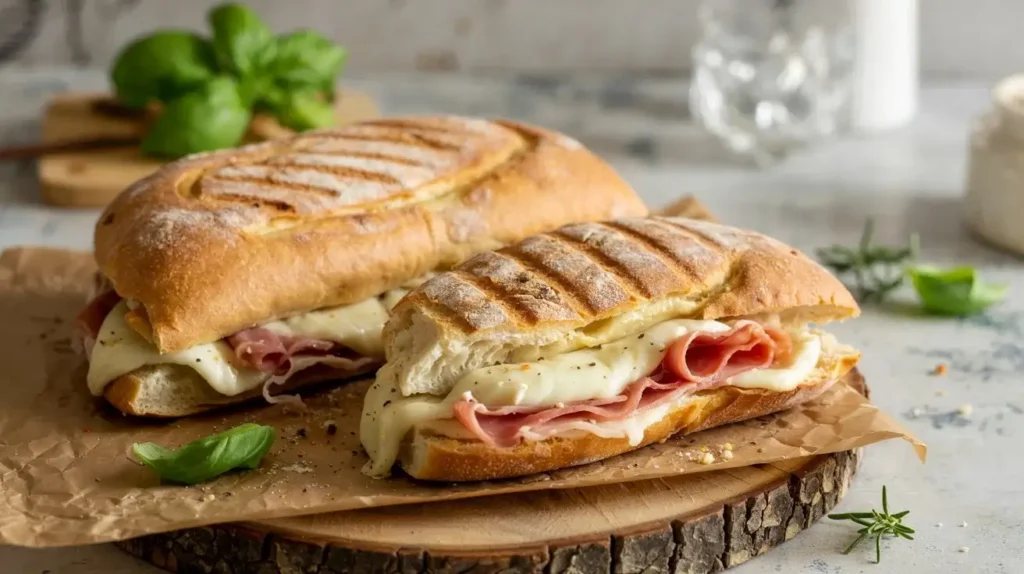
Ciabatta
Pros:
- The gold standard for panini bread sandwiches
- Rectangular shape perfect for sandwich construction
- Crispy exterior with large air pockets inside
- Sturdy enough to hold substantial fillings
- Develops beautiful grill marks
Selection Tips:
- Look for a well-formed crust with a light golden color
- When squeezed, should have some give but spring back
- Interior should have visible air holes but not be overly airy
Focaccia
Pros:
- Pre-seasoned with olive oil and often herbs
- Flat shape requires minimal slicing
- Distinctive flavor profile
- Excellent oil content helps with crisping
Cons:
- Can sometimes be too oily or fragile
- Thickness may vary, requiring careful filling selection
Selection Tips:
- Choose pieces of even thickness
- Light to medium golden color indicates proper baking
- Slight resistance when pressed indicates good structure
Sourdough
Pros:
- Distinctive tangy flavor
- Excellent sturdy crust
- Dense crumb structure holds up to pressing
- Generally slices cleanly and evenly
Cons:
- Very crusty varieties may be hard to bite through after toasting
- Strong flavor may compete with delicate fillings
Selection Tips:
- Choose medium-dense sourdough rather than very open-crumb artisan varieties
- Round loaves can be cut into half-circles for easier handling
Rustic Country Loaves
Pros:
- Hearty texture and flavor
- Generally good crust-to-crumb ratio
- Versatile with many filling combinations
Cons:
- Irregular shapes may require creative cutting
- Can vary widely in density
Selection Tips:
- Look for loaves with moderate, not excessive, air pockets
- Crust should be firm but not overly thick
Breads to Avoid
❌ Soft Sandwich Bread: Too squishy and lacks structure—becomes gummy when pressed ❌ Overly Airy Artisan Bread: Air holes too large to hold fillings properly ❌ Very Dense Pumpernickel/Rye: Too heavy and can overwhelm fillings ❌ Pre-sliced Supermarket Italian/French Bread: Often too soft and dries out quickly
Store-Bought Savvy
When searching for “panini bread near me,” here’s how to select quality options:
At Bakeries:
- Ask specifically for bread suitable for paninis—most bakers will guide you to appropriate options
- Ciabatta rolls or “panini rolls” are often available
- Fresh-baked focaccia can be excellent when sliced horizontally
At Supermarkets:
- Check the bakery section first rather than pre-packaged bread aisles
- Look for terms like “rustic,” “Italian,” or specifically “panini bread”
- Test firmness by gently pressing—should be resilient, not soft
- Check ingredients—fewer preservatives generally indicates better quality
Comparison Table: Panini Bread Options
| Bread Type | Ease of Finding | Cost | Flavor | Texture | Best For |
|---|---|---|---|---|---|
| Homemade Classic | Requires baking | $ | Exceptional | Perfect structure | Enthusiasts seeking the best quality |
| Homemade No-Knead | Requires planning | $ | Excellent | Very good structure | Busy people who plan ahead |
| Bread Machine | Requires equipment | $ | Very good | Good structure | Regular panini makers |
| Store Ciabatta | Widely available | $$ | Good to very good | Excellent | Convenience with quality |
| Store Focaccia | Moderately available | $$ | Very good | Good (can be oily) | Mediterranean-style paninis |
| Store Sourdough | Widely available | $$ | Strong, distinctive | Very good | Robust fillings |
| Supermarket “Panini Rolls” | Increasingly common | $ | Fair to good | Acceptable | Quick, convenient option |
Module 3: Pro Tips for Panini Perfection
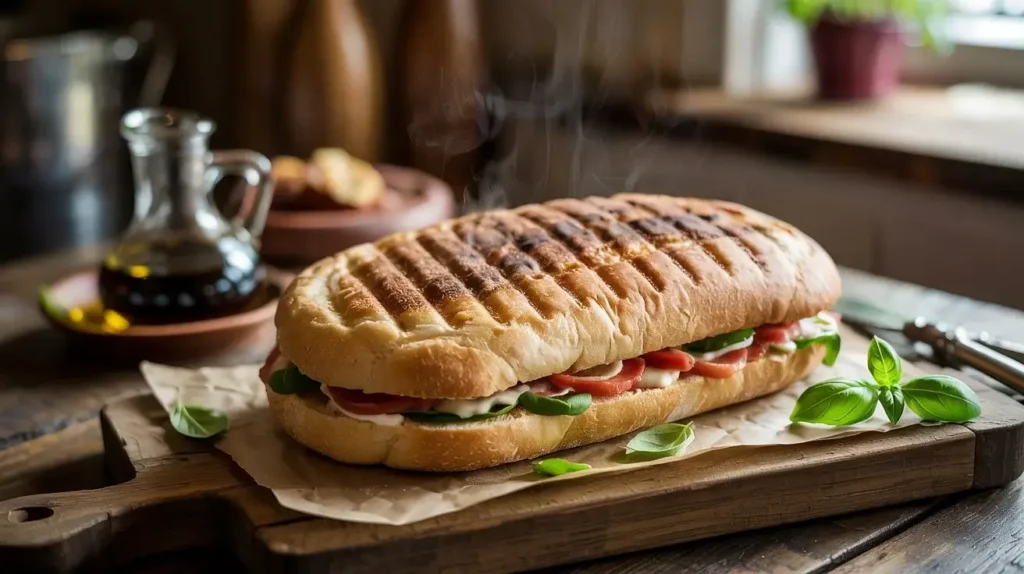
Achieving Perfect Grill Marks
- Preheat Thoroughly: Whether using a panini press or stovetop method, ensure it’s properly heated before adding your sandwich
- Apply Light Pressure: The weight of the press should do most of the work—pressing too hard flattens air pockets
- Diagonal Placement: Position bread at a slight angle to the grill ridges for more prominent marks
- Brushing Technique: Brush the bread with olive oil or melted butter, not the grill itself, for ideal marking
Optimal Pressing Techniques
“The perfect panini is pressed, not squashed. You want to hear a gentle sizzle, not a desperate wheeze of escaping fillings.” – Professional panini chef
- Start with Room Temperature Bread: Cold bread doesn’t press as evenly
- The 30-Second Rule: Apply slightly firmer pressure for the first 30 seconds, then ease up
- Gradual Pressure: Apply weight gradually rather than all at once
- No Panini Press? Use a heavy skillet and foil-wrapped brick or heat-safe weight
Avoiding Sogginess
- Butter the Outside: Creates a moisture barrier while adding flavor
- Manage Moist Ingredients: Pat tomatoes dry with paper towels before adding
- Strategic Layering: Place watery ingredients between layers of cheese or meat
- Toasting First: For very soft bread, lightly toast the inner faces before adding fillings
- Cool Hot Fillings: Allow hot ingredients to cool slightly before assembly
Slicing Thickness Recommendations
For optimal panini bread sandwich construction:
- Standard Slices: ½-inch (1.3cm) thick for most applications
- Focaccia: Cut horizontally through the middle for two thinner pieces
- Rustic Loaves: Slightly thicker ¾-inch (1.9cm) slices can work if the bread is not too dense
- Evening Technique: If slicing your own bread, ensure evenness for consistent heating
Module 4: Troubleshooting Common Panini Bread Issues
For Homemade Bread
| Problem | Possible Causes | Solutions |
|---|---|---|
| Bread too dense/tough | Over-kneading, not enough rise time, old yeast | Knead just until elastic, ensure proper rise time, check yeast freshness |
| Bread too airy/collapses | Under-kneading, wrong flour type, over-proofed | Knead properly to develop gluten, use bread flour, watch proofing time carefully |
| Crust too hard | Baking temperature too high, baked too long | Lower temperature slightly, reduce baking time, brush with olive oil after baking |
| Crust too soft | Insufficient steam, oven temperature too low | Use steam method, increase oven temperature, ensure proper preheating |
| Uneven shape | Improper shaping technique, uneven rise | Practice consistent shaping, ensure even temperature during rising |
For Store-Bought Bread
| Problem | Possible Causes | Solutions |
|---|---|---|
| Bread falling apart | Wrong type chosen, too thinly sliced | Select sturdier varieties, use thicker slices |
| Too chewy after pressing | Too much gluten development, pressed too long | Look for less “artisanal” options, reduce pressing time |
| Burns before fillings warm | High sugar content in bread, press too hot | Lower heat setting, brush very lightly with oil |
| Doesn’t develop grill marks | Too soft, not enough fat on exterior | Choose firmer bread, brush with olive oil or butter |
| Flavor overpowers fillings | Strongly flavored bread (e.g., sourdough) | Choose milder bread for delicate fillings |
Module 5: Variations & Flavor Boosts
Herb-Infused Panini Bread
Transform any of the basic recipes by adding:
- 2 tablespoons fresh rosemary, chopped
- 1 tablespoon fresh thyme leaves
- 2 teaspoons dried Italian herb blend
- 3-4 cloves roasted garlic, mashed
Method: Add herbs to the dry ingredients before mixing. For roasted garlic, incorporate during the kneading stage.
Cheese-Enhanced Variations
Add these to your dough for extra flavor:
- ½ cup grated Parmesan (reduces slightly to maintain dough consistency)
- ⅓ cup crumbled feta with 2 teaspoons dried oregano
- ¼ cup grated Asiago with cracked black pepper
Method: Fold cheese in gently after the first rise to maintain distinct pockets of flavor.
Flour Variations
• Whole Wheat Blend: Replace up to 40% of bread flour with whole wheat flour for nuttier flavor and added nutrition. Increase water by approximately 2 tablespoons per cup of whole wheat flour.
• Semolina Addition: Replace ¼ of bread flour with semolina flour for a slight yellow hue and pleasant texture. Particularly complements Mediterranean fillings.
• Ancient Grain Boost: Add 2-3 tablespoons of quinoa flour or amaranth flour to the basic recipe for subtle nutrition enhancement without compromising structure.
FAQ Section
Q: Can I use regular sandwich bread for panini? A: You can, but it’s not ideal because soft sandwich bread compresses too much and often becomes gummy when pressed. If it’s your only option, lightly toast it first and use a gentle touch with the press.
Q: Do I need a panini press to make paninis? A: No, while a panini press is convenient, you can create the same effect using a heavy skillet to press your sandwich as it cooks in another pan. A grill pan provides the characteristic marks, but even a regular skillet works—the key is applying even pressure.
Q: How long does homemade panini bread last? A: Properly stored in an airtight container or bag at room temperature, homemade panini bread stays fresh for 2-3 days. For longer storage, slice and freeze for up to 3 months. Thaw slices as needed and refresh in a warm oven for 5 minutes before using.
Q: Can I freeze panini bread? A: Yes, all panini bread freezes well. For best results, slice before freezing, separating pieces with parchment paper. Wrap tightly in plastic wrap and foil or use freezer bags with air removed. Frozen bread is actually excellent for panini making—toast from frozen or thaw first depending on your preference.
Q: What’s the difference between panini bread and regular bread? A: Panini bread typically has a sturdier structure with a firm crust and substantial crumb that can withstand pressing without becoming soggy or disintegrating. The interior has fewer large air holes than some artisan breads, making it better for holding fillings.
Q: Is panini bread healthier than regular bread? A: There’s no inherent nutritional difference—health factors depend on the specific ingredients in any bread. Artisanal panini breads often contain fewer preservatives than mass-produced sandwich bread. Choose whole grain varieties for added fiber and nutrients.
Conclusion
The journey to perfect panini bread—whether homemade from scratch or carefully selected from your favorite bakery—is well worth the effort. With the right bread as your foundation, even the simplest fillings transform into a memorable meal.
Remember that while traditional Italian varieties like ciabatta and focaccia remain the classic choices for authentic paninis, the perfect panini bread is ultimately the one that matches your personal preferences and complements your chosen fillings.
We hope this guide has equipped you with the knowledge and techniques to elevate your panini game, whether you’re baking your own artisanal loaves or making smarter selections when searching for “panini bread near me.” Happy pressing!
Share Your Creation!
I’d love to see how your panini bread turns out! If you make this recipe, please leave a comment and rating below. You can also share your creation by tagging me on pinterest @bake_iteasy with the hashtag #panini bread.
Did you try our recipe ?
There are no reviews yet. Be the first one to write one.