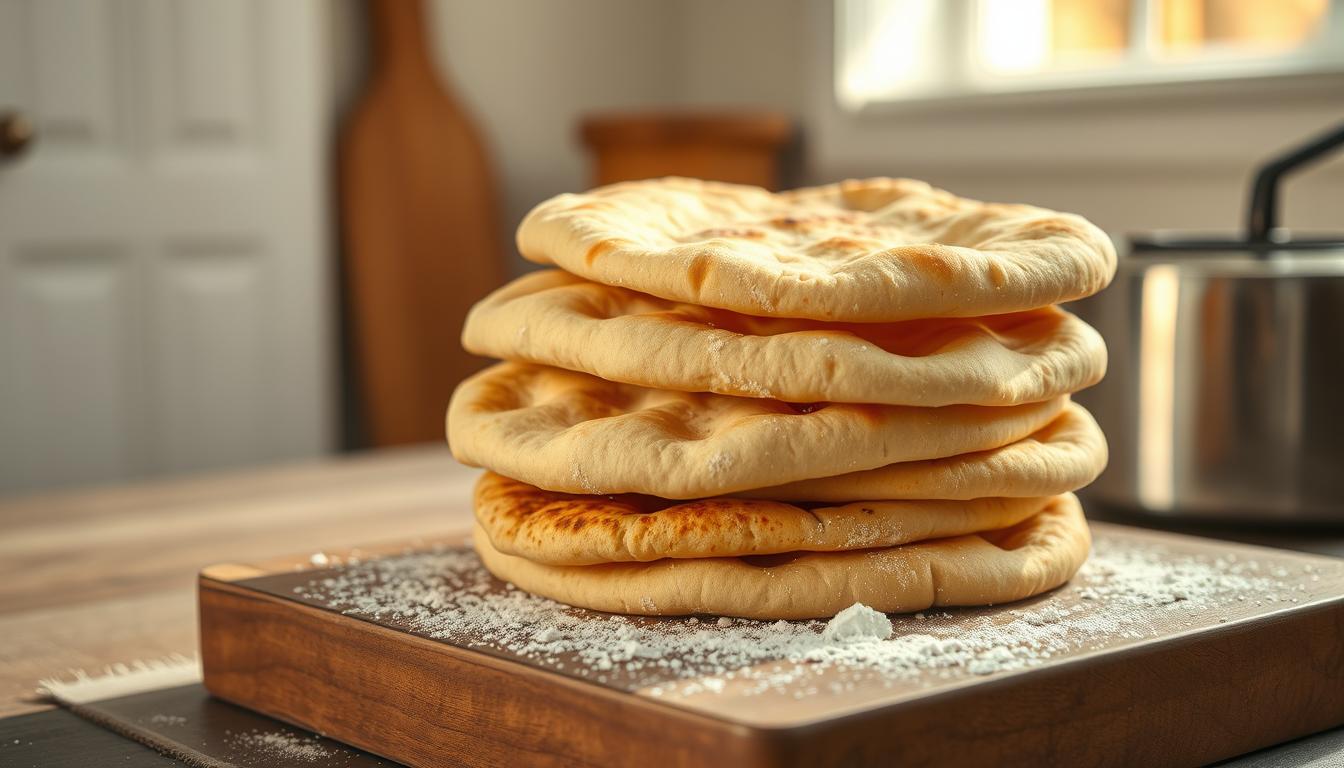
Gluten Free Pita Bread
Discovering tasty Gluten Free Pita Bread can change the game for those on a celiac diet. Gluten-free pita bread is a great option for those looking for delicious, versatile bread. It doesn’t sacrifice texture or flavor.
Making the perfect gluten-free pita bread involves special techniques. These methods turn alternative flours into soft, pillowy flatbreads. This guide will help you make mouth-watering pita bread that’s just as good as traditional wheat-based ones.
Imagine biting into a warm, tender pita that’s light, fluffy, and full of possibilities. With the right ingredients and methods, you can turn your kitchen into a gluten-free bakery. It will produce breads that are as good as those from restaurants.
Table of Contents
Key Takeaways
- Gluten-free pita bread can be just as delicious as traditional versions
- Alternative flours provide excellent wheat substitutes
- Proper technique is crucial for achieving ideal texture
- Homemade gluten-free pita bread offers superior flavor and freshness
- Understanding ingredient interactions helps create perfect pita
Understanding Gluten-Free Pita Bread Basics
Exploring grain-free baking opens new culinary doors for those with dietary needs. Pita bread, a favorite in Mediterranean cuisine, has become a tasty option for those with allergies. It’s a bread that everyone can enjoy.
What Makes Pita Bread Special
Pita bread is special because of its unique pocket and versatility. It comes from the Middle East and has won hearts worldwide. Its best feature is the pocket it makes when baked, ideal for fillings.
- Originated in Middle Eastern cuisine
- Creates a natural pocket when baked
- Versatile for multiple food preparations
Benefits of Going Gluten-Free
Going gluten-free can change lives for those with celiac disease or gluten sensitivities. Grain-free baking introduces you to tasty, healthy alternatives. You won’t miss out on flavor or texture.
Gluten-free doesn’t mean flavor-free – it means discovering new culinary adventures!
Key Characteristics of Perfect Pita
To make the perfect gluten-free pita, focus on key qualities. Your homemade flatbread should be soft, have a clean pocket, and taste great. These are the must-haves for a perfect pita.
| Characteristic | Ideal Outcome |
|---|---|
| Softness | Tender and pliable texture |
| Pocket Formation | Clean, even separation when baked |
| Flavor | Rich, satisfying taste without gluten |
Understanding these basics of gluten-free pita bread prepares you to make a delicious, safe bread. It meets both health and taste needs.
Essential Ingredients for Gluten Free Pita Bread

Making vegan pita bread for those with gluten intolerance is a journey. It starts with picking the right ingredients. These must be nutritious and flavorful.
The base of great gluten-free pita is the flour. Almond flour is a top choice. It’s packed with protein, healthy fats, and a nutty taste. Mixing it with tapioca starch makes the pita light and flexible, just like wheat-based ones.
- Almond Flour: Protein-rich alternative to wheat flour
- Tapioca Starch: Helps create soft, pliable texture
- Full-Fat Coconut Milk: Adds moisture and richness
- Salt: Enhances overall flavor profile
Choosing the right ingredients is key for a tasty gluten-free pita. Full-fat coconut milk is essential. It keeps the bread moist and prevents it from being dry. Adding garlic powder or herbs can make your pita extra special.
Pro tip: Always choose high-quality, fresh ingredients for the best gluten-free pita bread results.
Remember, each ingredient affects the pita’s texture and taste. Try different mixes to find your favorite gluten-free recipe. It should meet your nutritional needs and satisfy your taste buds.
Kitchen Tools and Equipment Needed
Getting ready to make gluten-free pita bread means picking the right kitchen tools. The right equipment is key to making tasty wheat alternatives for those with dietary needs. Whether you’re on a celiac diet or just trying gluten-free cooking, the right tools can really help.
Essential Baking Tools for Gluten-Free Pita Bread
Every home baker needs a basic set of tools for perfect gluten-free pita bread. Here are the must-haves:
- Large mixing bowl with high sides
- Precise measuring cups and spoons
- Sturdy whisk for blending ingredients
- Non-stick rolling pin
- Heavy-bottom frying pan or griddle
- Wire cooling rack
- Silicone or metal kitchen tongs
Optional Equipment to Enhance Your Baking
These extra tools can make your gluten-free baking even better:
- Digital kitchen scale for precise ingredient measurements
- Silicone baking mat
- Pastry bench scraper
- Infrared thermometer for checking surface temperature
Surface Preparation Essentials
Proper surface prep is key when working with gluten-free dough. Always have these items ready:
- Parchment paper
- Gluten-free flour for dusting
- Clean, smooth work surface
- Plastic wrap or clean kitchen towel
Investing in the right tools will help you make delicious, soft pita bread. It meets dietary needs and offers great flavor and texture.
Step-by-Step Preparation Method
Making gluten free pita bread needs precision and care. Start by getting the right ingredients and learning special techniques for allergen-free flatbread.
First, gather all the ingredients for your gluten free pita bread. Make sure your workspace is clean and organized. This helps you follow the recipe smoothly.
- Measure dry ingredients carefully
- Ensure all wet ingredients are at room temperature
- Use a digital kitchen scale for accuracy
- Prepare a clean, non-stick surface for rolling
Mix your ingredients to make a smooth, consistent dough. Gluten free baking requires extra care for texture and hydration. Aim for a dough that’s soft and pillowy.
- Combine your gluten-free flour blend
- Add binding agents like xanthan gum
- Mix wet and dry ingredients thoroughly
- Knead the dough until smooth
- Let the dough rest for optimal texture
The key to great allergen-free flatbread is knowing your dough’s consistency. Patience and practice will help you master the technique. Roll your dough evenly for even cooking.
Pro tip: Use parchment paper to prevent sticking and make handling easier during your grain-free baking process.
With careful preparation and attention to detail, you’ll make gluten free pita bread that’s just as good as traditional recipes.
Mastering the Perfect Dough Consistency
Making allergy-friendly bread needs precision and knowing how gluten-free dough works. The success of your pita bread depends on getting the right texture and consistency. This can be hard with different flour blends.
When making healthy baked goods for dietary needs, dough consistency is key. You want a smooth, easy-to-work-with mix. It should feel like regular bread but without gluten’s binding power.
Common Texture Problems and Solutions
Gluten-free dough can be tricky. Look out for these common texture issues:
- Overly sticky dough: Add rice flour or cornstarch
- Crumbly mixture: Increase liquid a little at a time
- Dense texture: Add xanthan gum for better structure
Temperature and Humidity Considerations
Environmental factors greatly affect your dough. Ideal dough preparation needs consistent temperature and controlled humidity. Try to keep the room at 70-75°F with moderate humidity.
Kneading Techniques
Kneading gluten-free dough is different from traditional methods. Use gentle folding and pressing. This avoids making the dough tough.
“Patience and gentle handling are key to perfect gluten-free pita bread” – Baking Experts
Pro tip: Use a silicone spatula or wet hands to mix and fold your dough. This ensures even hydration without gluten-like proteins.
Cooking Techniques and Tips
Making the perfect gluten-free pita bread needs some special cooking skills. These skills help bring out the best in wheat alternatives. Whether you’re dealing with gluten intolerance or looking for vegan pita options, getting the cooking right is key. It’s all about achieving that soft and puffy texture.
Stovetop cooking is the top choice for making real pita bread. Here are some important techniques to help you succeed:
- Use a cast-iron skillet or heavy griddle for even heat distribution
- Preheat your cooking surface to medium-high heat
- Cook each side carefully to prevent burning
Timing is crucial when making vegan pita bread. Keep an eye out for these important signs:
- Cook the first side for 3 minutes until tiny bubbles form
- Flip carefully and cook the second side for 1-2 minutes
- Look for a golden-brown color indicating perfect doneness
Oven baking is a great alternative if you don’t have a stovetop. Preheat your oven to 475°F and use a baking stone or heavy baking sheet. This method is great for wheat alternatives and ensures a consistent result for those with gluten intolerance.
Pro tip: Consistent temperature and proper technique are key to creating the perfect pocket in your gluten-free pita bread.
Storage and Reheating Methods
Keeping your allergen-free flatbread fresh is key. Whether you’re on a celiac diet or just love healthy baked goods, the right storage and reheating keep your gluten-free pita bread tasty and fresh.
Proper Storage Containers
Choosing the right container is important. Air-tight containers help keep moisture in and out. This keeps your pita bread’s texture and taste just right.
- Use glass or plastic containers with tight-sealing lids
- Avoid storing in paper bags or loose wrapping
- Place a paper towel inside to absorb excess moisture
Freezing and Thawing Guidelines
Freezing your gluten-free pita bread keeps it fresh longer. Here are some tips to help:
- Wrap individual pitas in plastic wrap or freezer paper
- Store in a freezer-safe zip-lock bag
- Label with the date of freezing
| Storage Method | Duration | Best Practices |
|---|---|---|
| Refrigerator | 3-4 days | Use air-tight container |
| Freezer | Up to 2 months | Wrap individually before freezing |
Reheating for Optimal Texture
To get your pita bread soft again, heat it gently. Avoid high temperatures that can dry out or toughen the bread.
- Microwave: 10-15 seconds on medium power
- Skillet: Light toast on medium-low heat
- Oven: Wrap in foil, heat at 350°F for 5 minutes
By using these tips, your gluten-free pita bread will stay fresh and delicious. It’s perfect for any meal or snack.
Serving Suggestions and Pairings
Your gluten-free pita bread is a doorway to tasty meals for those with dietary needs. It’s a flexible base for dishes that please many palates.
There are many ways to make your gluten-free pita bread a hit. Here are some tasty ideas:
- Mediterranean-inspired mezze platters
- Stuffed with fresh vegetables and protein
- Toasted and cut into triangles for dipping
- Used as a wrap for grilled meats or vegetarian fillings
Warmth is essential when serving your gluten-free pita bread. Serve it hot, brushed with olive oil or ghee. Add fresh herbs like oregano, thyme, or parsley for extra flavor.
Pairing your gluten-free pita bread with the right foods can make it even better. Try these:
- Dairy-free hummus
- Tzatziki made with lactose-free yogurt
- Roasted vegetable spreads
- Herb-infused olive oil
These ideas make sure everyone can enjoy a tasty meal, no matter their dietary needs.
Troubleshooting Common Issues
Grain-free baking can be tough, especially with vegan pita recipes. Knowing common problems helps make perfect pita bread every time.
Dough consistency is key in gluten-free baking. If your pita dough is too sticky, try these fixes:
- Add a tablespoon of almond flour to soak up extra moisture
- Chill the dough for 15-20 minutes to make it firmer
- Use parchment paper when rolling to avoid sticking
Texture problems are common in gluten-free breads. Dry, crumbly pitas often come from wrong flour mixes. Make sure you use a mix that gives structure and moisture.
When pitas don’t puff right, check these possible reasons:
- Make sure your yeast is fresh and active
- Check that your oven is always hot
- Roll dough evenly to ensure even puffing
For those with gluten intolerance, trying different flour mixes can help get the right pita texture. Don’t lose hope—each batch teaches you something new about grain-free baking.
Conclusion
Making allergen-free flatbread at home is more than a fun cooking project. It’s a way to eat healthier, especially for those on a celiac diet. Your homemade gluten-free pita bread is a tasty option that goes beyond regular bread.
Healthy baked goods like gluten-free pita show how easy it is to change up your meals. Making these flatbreads is not just about sticking to a diet. It’s about enjoying tasty, soft bread that’s good for you. You’ll learn to be more confident and creative in the kitchen.
Getting better at gluten-free baking takes time and practice. Every batch of pita bread you make will help you get better. This skill can make your cooking and eating choices much better.
We encourage you to share your gluten-free pita bread stories and ideas. Your journey to making healthy, tasty meals starts now. It’s all about one delicious, soft pita at a time.
Share Your Creation!
I’d love to see how your Gluten Free Pita Bread turns out! If you make this recipe, please leave a comment and rating below. You can also share your creation by tagging me on pinterest @bake_iteasy with the hashtag #Gluten Free Pita Bread.
Did you try our recipe ?
There are no reviews yet. Be the first one to write one.