artisan italian bread
Table of Contents

Introduction
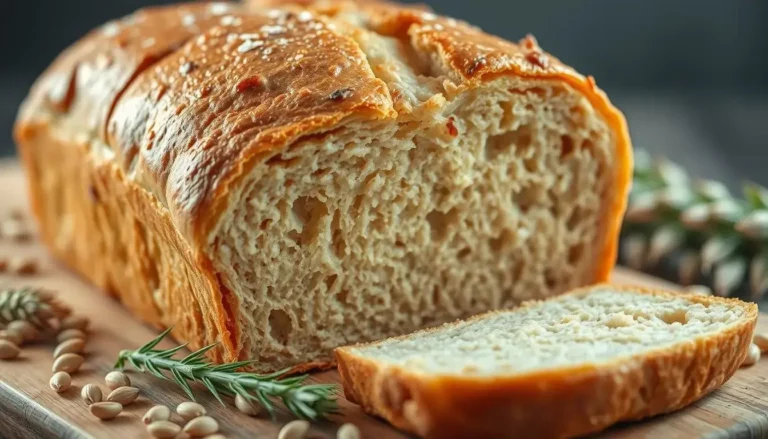
There’s something almost magical about breaking into a loaf of authentic artisan Italian bread—that moment when the crackling crust gives way to a tender, airy interior. The enticing aroma, the rustic appearance, and that first perfect bite represent centuries of baking tradition brought right to your kitchen.
True artisan Italian bread stands apart from mass-produced varieties through its simple, quality ingredients and traditional methods that develop incomparable flavor and texture. While it might seem intimidating to recreate this bakery favorite at home, I’m here to tell you that with the right technique, anyone can master this classic.
After testing dozens of methods and baking hundreds of loaves, I’ve perfected a foolproof crusty Italian bread recipe that delivers bakery-quality results in your home kitchen—without professional equipment or years of experience. Whether you’re a novice baker or looking to refine your bread-making skills, this guide provides everything you need to create spectacular artisan Italian bread that will impress family and friends.
By the end of this post, you’ll understand exactly what makes bread truly “artisan,” master the techniques for developing that coveted crust and open crumb structure, and gain troubleshooting knowledge to ensure perfect results every time.
Why THIS Recipe is Better
Unlike many other Italian bread recipes that sacrifice flavor for convenience or require specialized equipment, this recipe focuses on maximum flavor development with minimal active time. We’ve perfected the technique for an incredible crust even without professional bakery equipment.
The method combines traditional Italian breadmaking principles with accessible modern techniques. You’ll get authentic results whether you choose the no-knead approach for busy schedules or prefer the therapeutic process of traditional kneading. This versatility makes it perfect for both weeknight baking and special occasions.
Ingredients Deep Dive
What You’ll Need
- 500g (4 cups) bread flour
- 10g (2 teaspoons) salt
- 7g (2¼ teaspoons) active dry yeast or instant yeast
- 350ml (1½ cups) warm water (about 100°F/38°C)
- 15ml (1 tablespoon) good quality olive oil (optional)
- Semolina or cornmeal for dusting (optional)
Understanding the Ingredients
“The soul of artisan Italian bread lies in its simplicity—the magic happens in the method, not in a long ingredient list.”
Bread Flour: The higher protein content (12-14%) develops stronger gluten networks for better structure and that classic chewy texture. If using all-purpose flour instead, your bread will still be delicious but slightly less chewy and structural.
Salt: Beyond flavor, salt controls yeast activity and strengthens gluten. Never skip it! The 2% ratio (by flour weight) is traditional for Italian breads.
Yeast: Active dry yeast needs proofing in warm water before mixing, while instant yeast can be added directly to dry ingredients. Both work perfectly—choose based on what you have on hand.
Water: Temperature matters! Too hot (over 115°F/46°C) will kill yeast; too cool will slow fermentation. The 350ml creates approximately 70% hydration—the sweet spot for great crust and crumb without being too difficult to handle.
Olive Oil: While optional and not found in all traditional recipes, a small amount adds subtle flavor and helps preserve freshness. For the most authentic rustic Italian bread, you can omit it.
Essential Equipment (with Alternatives)
Must-Haves:
- Large mixing bowl
- Measuring cups and spoons (or kitchen scale—preferred for accuracy)
- Clean kitchen towel or plastic wrap
- Parchment paper
- Sharp knife or bread lame for scoring
Recommended for Best Results:
- Dutch Oven: Creates the perfect steamy environment for crust development
- Alternative: Baking stone/steel + oven-safe metal pan for steam
- Stand Mixer with Dough Hook: Makes kneading effortless
- Alternative: Good old-fashioned hand kneading (great arm workout!)
- Bench Scraper: Helps handle sticky dough
- Alternative: Stiff plastic spatula
- Proofing Basket: Creates beautiful shape and pattern
- Alternative: Bowl lined with well-floured kitchen towel
The Core Recipe – Step-by-Step Instructions
Method 1: Traditional Kneaded Artisan Italian Bread
- Proof the Yeast (if using active dry): Dissolve yeast in warm water with a pinch of sugar or flour. Wait 5-10 minutes until foamy. If using instant yeast, skip this step and add yeast directly to flour.
- Mix the Dough: In a large bowl, combine flour and salt. Add the yeast mixture (or water plus instant yeast) and olive oil if using. Mix until a shaggy dough forms.
- Knead the Dough: Turn onto a lightly floured surface and knead for 8-10 minutes until smooth and elastic. The dough should pass the “windowpane test”—when a small piece is stretched, it should form a thin membrane without tearing. Pro Tip: Rather than adding more flour to a sticky dough, use wet hands or a dab of olive oil to prevent sticking during kneading.
- First Rise (Bulk Fermentation): Place dough in a lightly oiled bowl, cover with plastic wrap or a damp towel, and let rise until doubled in size (about 1-2 hours depending on room temperature). Pro Tip: For superior flavor development, use a longer, slower rise in the refrigerator (8-12 hours or overnight).
- Shape the Loaf: Gently deflate the dough and shape into your preferred form—a round boule, oval batard, or elongated loaf. Avoid overworking the dough at this stage to preserve the air bubbles.
- Second Rise (Proofing): Place shaped dough on parchment paper dusted with semolina or cornmeal, or in a proofing basket. Cover and let rise until visibly puffy but not quite doubled, about 45-60 minutes.
- Preheat the Oven: While the dough proofs, place a Dutch oven (with lid) or baking stone in the oven and preheat to 450°F (230°C) for at least 30 minutes.
- Score the Dough: Just before baking, use a sharp knife or bread lame to make 2-3 decisive slashes about ¼-inch deep across the top of the loaf. This controls expansion and creates that artisanal look.
- Bake:
- Dutch Oven Method: Carefully transfer the dough on parchment into the preheated Dutch oven. Cover and bake for 25 minutes. Remove lid and bake for another 15-20 minutes until deeply golden.
- Baking Stone Method: Slide the dough (on parchment) onto the hot stone. Add 1 cup of hot water to a metal pan placed on the bottom rack to create steam. Bake for 35-40 minutes total.
- Cool Completely: Transfer to a wire rack and resist the temptation to cut into the bread for at least 1 hour. This crucial step allows the interior to finish cooking and moisture to redistribute.
Method 2: No-Knead Artisan Italian Bread
Perfect for busy schedules or those who find kneading challenging.
- Mix the Dough: In a large bowl, whisk together flour, salt, and instant yeast (if using active dry, dissolve in water first). Add water and olive oil if using. Stir until a sticky, shaggy dough forms—no kneading required!
- Long Fermentation: Cover the bowl with plastic wrap or a lid and let sit at room temperature for 12-18 hours. The slow fermentation develops gluten and creates amazing flavor.
- Shape: With floured hands, turn the dough onto a floured surface. Fold it over on itself just 2-3 times to form a rough ball, using as little flour as possible.
- Short Second Rise: Place on parchment paper, cover loosely, and let rise for about 30-45 minutes while your oven and Dutch oven preheat to 450°F (230°C).
- Score and Bake: Follow steps 8-10 from the traditional method above.
Key Techniques Explained
The Art of Mixing & Kneading
Proper kneading develops the gluten structure that gives artisan Italian bread its distinctive texture. Use the heel of your hand to push the dough away from you, then fold it back over itself. Rotate a quarter turn and repeat. The dough is ready when it feels smooth and springs back when poked.
If using the no-knead method, time does the work for you—the long fermentation allows proteins to align naturally, creating gluten without physical kneading.
Bulk Fermentation & Folding
This initial rise is where flavor magic happens. During this time, yeast consumes sugars and produces carbon dioxide (creating rise) and alcohol (creating flavor). For enhanced texture in either method, consider using “stretch and folds”:
- Every 30 minutes during the first 1-2 hours of fermentation, gently pull one side of the dough and fold it over the center
- Rotate the bowl 90° and repeat three more times
- This strengthens the dough without degassing it
Shaping the Loaf
Proper shaping creates surface tension that helps the bread rise upward instead of outward:
- Lightly flatten the dough into a rough rectangle
- Fold the bottom third up like a letter
- Fold the top third down
- Turn 90° and fold in half
- Roll and tighten the dough using your hands and the countertop to create tension on the surface
- Pinch seams together on the bottom
Proofing: The Final Rise
The second rise (proofing) prepares the shaped dough for baking. The loaf is ready when:
- It has visibly expanded (though not necessarily doubled)
- A gentle poke with a floured finger leaves an indentation that slowly fills back partially
- The dough feels light and airy
Underproofed dough will be dense with uneven air pockets; overproofed dough will collapse in the oven.
Scoring: Form Meets Function
Scoring isn’t just decorative—it allows controlled expansion during the dramatic oven spring. Make confident, decisive cuts about ¼-inch deep using a very sharp knife or bread lame held at a 45° angle. Simple patterns for Italian bread include:
- Single long slash down the center
- Three parallel diagonal slashes
- Double crossed slashes (“X” pattern)
Baking – Achieving the PERFECT Crust
The secret to that crackling crust lies in steam during the initial baking phase. Steam delays crust formation, allowing maximum rise (oven spring) before the crust sets.
Dutch Oven Method: The closed pot traps the moisture naturally released from the dough, creating the perfect steamy environment. This is why the lid comes off halfway—first we get the rise, then we develop color and crunch.
Baking Stone Method: You’ll need to create steam manually by placing a metal pan on the bottom rack during preheating, then adding hot water right after loading your bread. Be careful of the steam when opening the oven!
Temperature and Time: The high temperature (450°F/230°C) is essential for proper crust development. Your bread is done when:
- The crust is deeply golden brown (not pale!)
- The bottom sounds hollow when tapped
- Internal temperature reads 205-210°F (96-99°C) if you have a thermometer
Troubleshooting Common Issues
Why didn’t my bread rise?
Problem: You’re left with a dense, flat loaf.
Solutions:
- Check yeast freshness and expiration date
- Ensure water temperature isn’t too hot (kills yeast) or too cold (slows activity)
- Give it more time—in cooler kitchens, rising can take twice as long
- Make sure your kitchen isn’t too cold (below 65°F/18°C)
Why is my crust too soft?
Problem: You wanted that crackling artisan crust but got something softer.
Solutions:
- Ensure proper steam at the beginning of baking
- Bake until deeply golden—don’t fear the color!
- Check that your oven temperature is accurate (use an oven thermometer)
- Leave bread in the turned-off oven with door cracked open for 5-10 minutes after baking
Why is my crust too hard?
Problem: The crust is difficult to chew through.
Solutions:
- Slightly reduce baking time
- Brush with a little olive oil right after baking
- Store properly (not in plastic, which softens crust)
Why is the inside gummy?
Problem: The interior is dense and gummy rather than airy.
Solutions:
- Allow bread to cool COMPLETELY before slicing (at least 1 hour)
- Check that bread is fully baked using internal temperature
- Ensure proper dough hydration—too wet makes gummy bread
- Check oven temperature accuracy
Why did my loaf spread out instead of up?
Problem: Your bread is flatter than desired.
Solutions:
- Create more surface tension during shaping
- Don’t overproof the dough
- Use a proofing basket or bowl to encourage upward rise
- Check flour protein content—lower protein flours spread more
Variations & Add-ins
Transform your basic artisan Italian bread into something special with these additions (incorporate during the initial mixing):
Herbs & Aromatics
- Rosemary & Sea Salt: 2 tablespoons fresh chopped rosemary + flaky sea salt topping
- Garlic & Herb: 3-4 cloves roasted garlic + 1 tablespoon Italian herb blend
- Basil & Sun-Dried Tomato: ¼ cup chopped sun-dried tomatoes + 2 tablespoons fresh basil
Texture Additions
- Whole Grain: Replace ¼ of bread flour with whole wheat for nuttier flavor
- Seeded Crust: Brush top with water and sprinkle with sesame or poppy seeds before baking
- Olive Bread: Add ¾ cup pitted, chopped olives during shaping
Sweet Variations
- Fig & Walnut: ½ cup each of chopped dried figs and walnuts
- Raisin & Fennel: ⅓ cup golden raisins + 1 tablespoon fennel seeds
Serving Suggestions
Traditional Italian bread isn’t just a side—it’s an essential component of the meal:
- Classic Pairing: High-quality extra virgin olive oil with balsamic vinegar for dipping
- Bruschetta: Toasted and topped with tomatoes, basil, and garlic
- Accompaniment: Alongside pasta, soups, or stews to soak up sauces
- Panini: Sliced horizontally for spectacular Italian sandwiches
- Crostini: Thinly sliced, toasted, and topped with spreads for appetizers
Storage Instructions
Artisan Italian bread, with its crisp crust, requires proper storage:
- Day 1-2: Store cut-side down on a cutting board or in a paper bag at room temperature
- Day 3+: Refresh stale bread by sprinkling with water and heating in a 350°F (175°C) oven for 5-10 minutes
- Freezing: Wrap tightly in plastic, then foil, and freeze for up to 3 months
- Avoid refrigeration: This actually accelerates staling!
| Storage Method | Crust Quality | Freshness Duration | Best For |
|---|---|---|---|
| Paper bag | Maintains crispness | 2-3 days | Short-term storage |
| Bread box | Slightly softens | 3-4 days | Balanced approach |
| Plastic bag | Softens crust | 4-5 days | Soft crust preference |
| Freezer | Requires refreshing | Up to 3 months | Long-term storage |
Printable Recipe Card
Artisan Italian Bread Recipe
Prep Time: 20 minutes (plus 2-3 hours rising or 12-18 hours for no-knead)
Cook Time: 40-45 minutes
Total Time: About 3-4 hours (or 13-19 hours for no-knead)
Yield: 1 large loaf (about 10-12 servings)
Ingredients:
- 500g (4 cups) bread flour
- 10g (2 teaspoons) salt
- 7g (2¼ teaspoons) active dry or instant yeast
- 350ml (1½ cups) warm water
- 15ml (1 tablespoon) olive oil (optional)
- Semolina or cornmeal for dusting
Instructions:
- If using active dry yeast, dissolve in warm water for 5-10 minutes until foamy. For instant yeast, mix directly with flour.
- In a large bowl, combine flour and salt. Add yeast mixture (or water plus instant yeast) and oil if using. Mix until a shaggy dough forms.
- Knead for 8-10 minutes until smooth and elastic.
- Place in a lightly oiled bowl, cover, and let rise until doubled (1-2 hours).
- Shape into a loaf, place on parchment dusted with semolina, cover, and let rise 45-60 minutes.
- Preheat oven to 450°F (230°C) with Dutch oven or baking stone inside.
- Score the top of the loaf with a sharp knife.
- Bake covered in Dutch oven for 25 minutes, then uncovered for 15-20 minutes. If using a stone, add steam and bake for 35-40 minutes total.
- Cool completely before slicing.
See full post for no-knead variation and detailed tips.
Final Thoughts
Creating authentic artisan Italian bread at home connects you to centuries of baking tradition. While it takes some time, the process is forgiving, and the results are infinitely rewarding. There’s incomparable satisfaction in pulling a perfect crusty loaf from your oven, hearing that crackle as it cools, and sharing it with appreciative friends and family.
Remember that bread-making is both science and art—each loaf is unique, and even “imperfect” loaves are usually delicious. With practice, you’ll develop an intuitive feel for the dough and create consistently amazing results.
Have you tried making artisan Italian bread at home? Do you prefer the traditional kneaded method or the hands-off no-knead approach? Leave a comment below with your experiences or questions, and don’t forget to share photos of your beautiful homemade loaves!
Share Your Creation!
I’d love to see how your artisan italian bread turns out! If you make this recipe, please leave a comment and rating below. You can also share your creation by tagging me on pinterest @bake_iteasy with the hashtag #artisan italian bread.
Did you try our recipe ?
There are no reviews yet. Be the first one to write one.